Enhanced Background Tutorial
This tutorial is written for Paint Shop Pro Version 6.0 and will guide you through the creation of the patterned background you see on this page.The color combinations are limited only by your own preferences however I used two very different colors so that the pattern would be obvious.
Programs needed:
This is a simple tutorial and does not require the use of layers unless you feel you would like to change or save each step individually.
Set up your Paint Shop Pro window with two colors of your choice. For this tut I've used:
R=138 G=84 B=116 (mauvey color) as the background color and
R=162 G=193 B=196 (greenish color) as the foreground color
-
Open an image 100 x 100 background color.
- Click
on the Air Brush Tool and enable settings to:
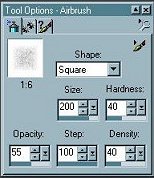
a. Shape = Square
b. Size=200
c. Hardness=40
d. Opacity=55
e. Step=100
f. Density=40
g. Paper Texture=None
-
Hold the airbrush tool over the image at the 50:50 coordinates (view the coordinates at the lower left of your status bar) or use the ruler to line up the airbrush at the 50 mark both in height and width.
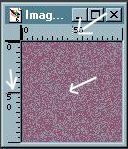 Your airbrush should point where the center arrow is.
 -
Press on the left mouse button only once. Your image should look like this:
- Images--->
Noise ---> add noise 6%. This will not make a noticable change
in your image but will stabilize the texture.
- Images--->
Plug in filters ---> Eye Candy ---> swirl
Swirl settings as follows:
a. Whirlpool Spacing=5
b. Smear length=9
c. Twist=100
d. Streak detail=17
e. Smooth=yes
f. Warp=no
Style is Typical -
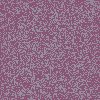
After adding the Eye Candy Filter in this manner your image should look something like this:
( This image can also serve as a pretty muted background but needs be edited in PSP to tile seamlessly).
- Images
--->Filter Browser---> Edge Enhance (1st filter if settings
are to default)
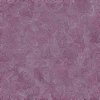
Your image should appear like this:
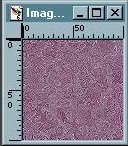
That creates the basic composition of the image. In order for this to appear to tile seamlessly when used you will need to remove a small area of the edges as explained below.
Selection tool Rectangular--->antialias unchecked.
Make a selection approx. 10-12 pixels from the edge of the image
---->
Edit-->Copy
Edit-->Paste as a new image.
I prefer this to the crop method however you can use that method if you prefer.That's all there is to that.
Here are several backgrounds already created for you. Your finished product should look like this however it's also fun to experiment with the different variations you can achieve by adjusting the filter settings.
Notice that the pattern views a bit differently with different combinations of colors. Have fun experimenting with the different color mixtures.


Use
of these images and/or tutorial indicates an acceptance of the Terms
of Use.
A link back to http://www.pointoffocus.com is required.
Back to main page Graphics section